
In the race for product development, speed is paramount. The core value of rapid prototyping services lies in “rapid learning,” not just “rapid making.” For R&D teams, 3D printing (Additive Manufacturing) is the ultimate tool to achieve this. This guide explores how to systematically leverage 3D printing for iterative design and shares practical tips to maximize the value of each iteration, helping you navigate the journey from concept to low-volume manufacturing.
Building an Efficient Iteration Cycle: Start with “What to Validate”
An efficient cycle is not about printing blindly but conducting a verification loop with clear objectives.
Iteration 1: Proof of Concept (Prioritize Speed)
Goal: Quickly and cost-effectively verify the product’s dimensions, basic form, and ergonomics.
Process Choice: Fused Deposition Modeling (FDM) is ideal. Using standard PLA or ABS materials, you can obtain a physical part within hours, even at lower resolutions (e.g., 0.3mm layer height).
Design Tip: Models can be solid to save time. Focus on overall proportions and overlook internal structures.
Iteration 2: Form, Fit, and Function Testing (Prioritize Fidelity)
Goal: Test moving parts, assembly clearances, and functional performance under specific conditions.
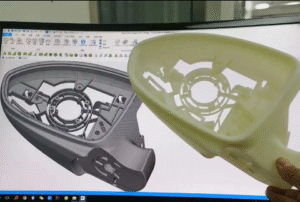
Process Choice: Switch to high-precision processes like Stereolithography (SLA) or Selective Laser Sintering (SLS). SLA offers smooth surfaces and fine details, ideal for housings with watertight requirements. SLS can create complex internal structures and living hinges without support, perfect for testing transmission mechanisms.
Design Tip: Apply real assembly tolerances here. For SLA, a recommended clearance is 0.2-0.3mm; for SLS, 0.3-0.5mm is needed. Print directly from final CAD data, including all snap-fits, bosses, and other features.
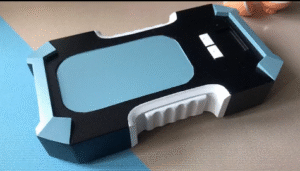
Iteration 3: User Testing & Market Feedback (Prioritize Aesthetics & Haptics)
Goal: Achieve a look, feel, and weight indistinguishable from the final product for high-stakes presentations or focus group testing.
Process Combination: Use high-resolution SLA printing for the main body, followed by professional post-processing like sanding, painting, and pad printing. For parts requiring metallic finish or weight, combine with CNC machined metal components. This prototype can now serve as a pre-production sample or bridge to vacuum casting for medical devices, consumer electronics, or other low-volume manufacturing runs.
Optimizing Design to Unlock the Full Potential of 3D Printing
Design for the Process: Understand the limitations of your chosen technology. For instance, SLA requires support structures—design to place them on non-cosmetic surfaces. SLS supports nesting—pack multiple small parts into a single build to maximize chamber space and reduce cost per part.
The Iteration Log is Crucial: Maintain a simple log for each version—what was changed, why, and the test results. This ensures institutional knowledge is captured and prevents circular backtracking.
Conclusion: From Prototyping Partner to Production Bridge
View 3D printing not just as a prototyping output device, but as a dynamic validation lab. By defining goals for each iteration and matching them with the correct process, you can shorten development cycles by weeks or even months, ensuring your design is perfected before committing to expensive tooling. This is the core strategic advantage that professional rapid prototyping services offer modern teams. Furthermore, a high-fidelity 3D-printed prototype serves as the perfect master model for vacuum casting, enabling a seamless transition to cost-effective, high-quality low-volume manufacturing—a critical step for market testing and early-stage production.
Leave a Reply